9.15.2010

We Didn't Start the Fire

(you'll be happy to know that this weekend, during our grilling-capades, we did not start any fires, it's just an awesomely catchy Billy Joel song)

Anyway, moving on, this weekend - on Saturday - we grilled out for dinner. It was nice out, there were never-ending football games playing, and it just seemed like the right thing to do. Plus, back home in the Johnson house it's typical to grill at least one to two times a week, and here at this Jackson house we had yet to do so, until this weekend - so it was about time. We had a blast! We grilled pork chops and veggie kabobs, and made some mashed potatoes. Chris handled the meat and I handled the veggies and our grilling-capades went a little like this:


Vegetable Kabobs are pretty easy if you've never done them:
- Choose a variety of vegetables
- Dice them up into large pieces (mushrooms and cherry tomatoes do not need dicing)
- Run them through kabobs/skewers
- Season with salt and pepper (I also like to add a garlic based seasoning)
- Place over coals to char the kabobs
- Move to side for veggies to cook


 "Chris, give a thumbs up." I think I snapped the picture too soon? Ooops.


Maeby taking in the smells, watching from the patio, and hoping that we will have leftovers for her


Mashed Potatoes (everyone does these differently, here's how I do it):
- Boil whole potatoes. Boiling them whole generally takes a little bit longer than dicing them up, but when you leave them whole to boil it helps to retain the nutrients you want in the potatoes. The more you cut them, the more of the good  stuff they lose. So if you have time, I suggest boiling them whole.
- Drain the potatoes.
- Give them a rough mash
- Add butter, sour cream, and S&P to taste
- Continue mashing until you're satisfied
*I like to leave the skin on the potatoes and mashes them only as much as I have to - I prefer actual pieces of the potatoes rather than "creamed potatoes."


Pork Chops (this will be a rough instruction, Chris cooked these so I don't know much about this):
- Season pork chops with S&P and any other desired seasoning.
- Let them sit in the refrigerator for a couple hours.
- (Here, I would tell you how to get the grill right, but I don't know. I'll learn and get back to you)
- Place the chops over the coals.
- Cook on first side for 4-6 minutes depending on size and thickness (you can see the sides of the pork chop turning white, then it's about time to flip)
- Once flipped, paint on some bbq sauce of your choosing (I use my dad's homemade because it is the best)
- Once the other side is done, put them on a plate and paint remaining side with bbq sauce.
- Cover chops with foil, then place a towel over the foil to help keep them warm and juicy until you are ready to eat (it's science). 


Enjoy your meal!

9.13.2010

DIY: Chest of Drawers

In an effort to make our room feel modern, collective, and less "college-bachelor-pad-ish" I decided that Chris's old chest of drawers needed a little make-over. This particular set was a bright wooden color and had been missing a knob for quite some time.  Since I had been working on our dining room table all last weekend, I figured I should keep with the flow before losing momentum. And by keeping with the flow I mean staying high on paint fumes. 


This was a fairly inexpensive project since I had already been painting and revamping furniture around this place, and I pretty much already had everything I needed besides a couple extra cans of spray paint and knobs to replace the old ones. 

I've decided not to put a "need" and "direction" section on this post since it's the exact same "needs" and "directions" as the table I posted last week - the only extra thing you need is knobs - unless you just want to paint existing knobs. 

I can't find the exact knobs I picked out to share with you, but I got them from Target and they look similar to theseNow, let me just say, had it been up to me, I would have picked clear, vintage crystal-like knobs, or slate blue colored knobs - both were at Hobby Lobby and were screaming my name, but I share a room with a boy now, so we have to compromise. The knobs I ended up getting were black and looked kind of distressed with bronze underneath. I actually kind of like them, but they aren't vintage crystal. 

I didn't distress this chest of drawers - yet. I still haven't decided if I want to because I kind of really like it solid black. Maybe later. 


As Promised

As promised, I made Puppy Chow on Friday afternoon to get us through the weekend. As long as I can remember, I have been cursed with the most intense sweet-tooth in existence. If there isn't ice cream, cupcakes, or something of sweet substance in the house, I go a little bit insane.


Saturday morning, as Chris and I are scarfing down hand-fulls of Puppy Chow (remember, it's made with peanut butter and cereal, guys - breakfast!), Chris said I shouldn't make this anymore. I guess I need to agree. For now. We killed that batch this weekend. It's dangerous to have around the house. I'm just saying.

9.11.2010

I Could Scream

...because I am so. excited!

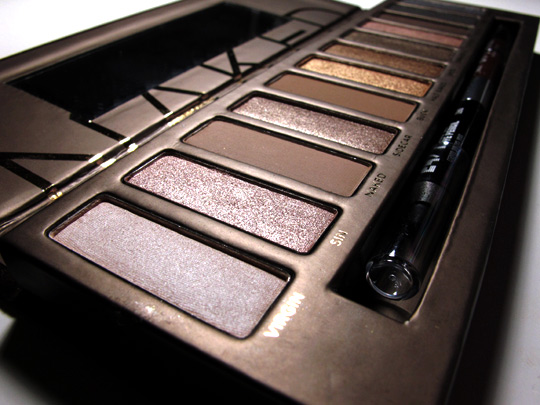
Y'all, I have been on the HUNT for Urban Decay's Naked Palette. I have seen this thing everywhere and heard nothing but the best about it. So last week I decided that this palette was:

1. Versatile for me and my makeup needs.
2. Priced well for all that you get (considering UD eye shadow pods are $18 each - and this one comes with 12 which are the same size as an individual pod, plus two eye pencils - that I've heard fabulous things about, and a travel sized UD Eye Primer Potion) It's a deal.
3. Great for traveling (because it's so slim and versatile).

So I was greatly disappointed when I walk into my local Sephora and it's no where to be found. A lady called the Sephora warehouse and they were out. Ulta was out. UD warehouse was out. Everywhere on the internet - OUT. There's nothing more disappointing than deciding you are going to splurge a bit on something well worth it, and then find out it's nowhere to be found. After the lady hung up the phone, she informed me that the palette was in high demand and was sold out everywhere (and it was only released mid-July). UD is working hard in the factory and would hopefully have some made and back in stock in 3-4 weeks. 3-4 WEEKS??? How can I wait that long when I want it now? I was tapping into my inner Veruca Salt. That's definitely a characteristic of mine: when I want something, I want it then. Instant results. I likey.

So all week long I have religiously, like at least three times a day, been checking Sephora, Ulta, UD, google shopping, and the entire WWW for "Urban Decay Naked Palette". Except today. I usually wake up and immediately check.

I almost didn't check today. But for some reason I decided ehhh I guess I'll take a look - not hopeful at all. Why would I be? They are non-existent for another 3+ weeks. Then... Amazon.com popped up: IN-STOCK. I did a double check to make sure it was 1. New, 2. the real thing, and 3. Still in-stock. My jaw dropped. I added it to my cart, leaped off the couch for my purse, and got through the check out process probably setting some kind of Guinness Book of World Records record. And now... IT'S ON ITS WAY!

Just made my weekend.


Isn't it beautiful?

DIY: Dining Room Table

Our dining room table is the table Chris had throughout his college years. It was a two-toned rectangle table with windsor chairs. By the time we moved in together, the table was down to three chairs - and really, only two of the chairs are usable. The third is just too wobbly. Chris liked to release frustration during football games and while doing math problems on his chairs. Oop. At least three made it out alive! Here is the table and the chairs before the Labor Day weekend makeover: 


Giving the old dining table and fresh, new look:

Need: 

- Liquid sander or sandpaper $8
- Small can of black paint* $7
- 4-6 cans of black spray paint $15
- Paint brush already had
- Polyurethane $5
- Foam brush already had
- Plastic drop cloth already had

Total: $35


* It's your personal preference whether you would like flat, satin, or glossy finish for your table; however, if you are using both a can of paint and spray paint, be sure to coordinate the finish so that chairs and table aren't different finishes. Unless that's what you want. Then go for it!

Directions (table):

- If you are working inside, place the drop cloth under table to protect floor.
- Sand entire table and chairs - if you are using liquid sander, follow directions on label. Mine suggested two coats and it took about 10 minutes for each coat to dry. 
- Once sanding is complete, apply first coat of paint. Allow adequate time to dry (see paint label), then apply second coat. Continue this process as desired. 
- Allow final coat to dry 24 hours.
- Apply first coat of polyurethane to top of table (or entire table - your preference)
- Allow drying time (generally 3-4 hours), then apply second coat.
- Allow final coat to dry 24 hours before being used.  


Directions (chairs):

- Find a workable area outside and place down cardboard or plastic drop cloth - if it's a windy day, you are going to want to go with the cardboard, Trust me. 
- Sand the chairs.
- If using spray paint, apply several light layers of paint. This helps to assure no running - which never looks good.
- Be sure to allow drying between coats. This takes about 3-4 coats and about 1.5 cans per chair.
- Allow final coat to dry 24 hours.
- If desired, apply first layer of polyurethane. I wanted the seats of the chairs to be protected - from possible spills or dropped food. 
- If you do not want this extra protection, feel free to stop here. 
- Allow drying time (3-4 hrs), then apply second coat. 
- Allow final coat to dry 24 hours before being used. 


And here is my final project:


(Please excuse the space. I still need an area rug and some decor on the walls.)

Because we were down to only two dining chairs, I needed to purchase four more to complete the table. I did my research and found some nicely priced Windsor chairs at Walmart by Better Homes and Gardens. The seats of the chairs are wooden, however, I kind of really like it. It gives the table a slight antique look and if I ever decide to distress the table, the chairs add to the look. And I can always bust out the spray paint and paint them black if I want to do that too.